Introduction. 1
The Digital Dashboard Resource Kit 2.0. 2
Digital Dashboard Terminology. 3
Choosing Your Platform.. 5
Windows File System.. 6
SQL Server 6
Exchange 2000 Server 6
Installing a Sample Digital Dashboard. 7
Installing the Windows 2000 File System Sample Dashboard. 7
Installing the SQL Server Sample Digital Dashboard. 8
Creating a New Digital Dashboard. 10
Adding Web Parts. 10
Customizing a Digital Dashboard. 14
Modifying Basic Properties. 14
Changing the Appearance of the Dashboard. 15
Displaying Sub-Dashboards. 16
Integrating a Digital Dashboard with Outlook. 17
Running the Digital Dashboard Samples in Outlook Today. 17
Configuring a Digital Dashboard for Offline Use. 19
Managing Digital Dashboards and Web Parts. 21
Managing Security and Personalization. 22
Deploying the Sample Digital Dashboards. 27
Deploying a File System Digital Dashboard. 27
Deploying a SQL Server Dashboard. 28
Building and Deploying Digital Dashboards

White Paper
Published: May 2000
For the latest information, please
see http://www.microsoft.com/dns/km
A digital dashboard is a customized portal for
knowledge workers that consolidates personal, team, corporate, and external
information and provides single-click access to collaborative tools. With the
introduction of the Digital Dashboard Resource Kit 2.0, Microsoft is enabling
customers and partners to develop a new generation of customizable digital
dashboards based on Internet standards.
Across an enterprise, different groups of users
need access to distinctly different types of information. The executives in a
company may need a high-level view of up-to-date sales statistics in addition
to industry news and competitive intelligence, while the sales team in the same
company may need detailed customer, product, and sales information. With its
flexible, modular architecture, a digital dashboard makes it easy for you to
create personalized applications that meet the needs of users throughout your
organization.
The following illustration shows a digital
dashboard for a company called Adventure Works. The dashboard is running in
Microsoft Outlook and displays a user’s inbox, team information, and sales and
IPO data. Links to other Adventure Works dashboards appear under the dashboard
header, which is customized with the company’s logo. At the upper-right corner
are links to customization pages with which the users can customize the look
and feel of their dashboards.
When Microsoft released the Digital Dashboard
Starter Kit in April 1999, it was an instant success. The company distributed
more than a million starter kits, demonstrating a huge demand for customized
applications that developers and administrators can build quickly and easily.
Microsoft listened carefully to feedback from customers and redesigned the
digital dashboard around the following requirements:
·
End users need access to relevant information
through an application that has a familiar interface. End users need to be able
to tailor their dashboards to display customized information.
·
Developers need a platform that exposes a
variety of services and can incorporate any kind of data from a variety of
sources. To meet the needs of multiple groups throughout an organization,
developers need to be able to build reusable components that adhere to a common
standard.
·
Information technology professionals such as
system administrators need a flexible deployment model that is easy to manage
and maintain.
Using the Digital Dashboard Resource Kit 2.0,
developers and administrators can quickly build and deploy customized digital
dashboard solutions. The resource kit includes all necessary tools and
documentation, in addition to sample dashboards and Web Parts—reusable
components that can contain any kind of Web-based content.
At the heart of the digital dashboard are Web
Parts. Web Parts are reusable components that contain Web-based content such as
XML, HTML, and scripts, and have a set of standard properties that controls how
the Web Parts are rendered in a digital dashboard. These properties make Web
Parts and dashboards storage-neutral and completely reusable.
Web Part properties include the following:
·
Basic metadata, such as a title, description, and date the Web Part was last
modified.
·
Content, such as the type of
content the Web Part contains and the source from which the Web Part gets its
content. For example, content can be embedded in the Web Part itself, or it can
come from for a URL on the Internet or your company’s intranet.
·
Appearance, such as the height and width of the Web Part.
·
Execution, such as whether and
how often Web Part content is refreshed, and whether the Web Part is isolated
from other Web Parts on the dashboard.
Because Web Parts adhere to a common standard,
you can store them in libraries that you can draw from to assemble all digital
dashboards in your organization.
Many Web Part and dashboard properties are
user-specific, but as an administrator, you can control the extent to which a user
can modify Web Parts or dashboards. For example, you can lock
down the Web Parts in
a given dashboard, making it impossible for users to remove them. For
information about how to set Web Part properties, see “Adding Web Parts” later
in this paper.
Digital Dashboard Samples
The Digital Dashboard Resource Kit includes a
set of sample digital dashboards that you can use to jump start your digital
dashboard deployment. To help minimize desktop impact, these samples are hosted
on a server and users connect to their dashboards using a Web browser. Because
these digital dashboards are samples, you may want to consider working with one
of Microsoft’s digital dashboard partners for large-scale digital dashboard
deployments that require a sophisticated set of management tools.
The digital dashboard samples have an enhanced
user interface that combines familiar Office features with easy-to-use
Web-browser-style controls. Users can click links to customization pages that
allow them to customize their digital dashboards, create new Web Parts, or
import Web Parts from Web Part libraries on the Internet or a local intranet.
The customization pages are intuitive to use and feature controls that are
familiar to users; for example, on the layout page, users can position Web
Parts on a dashboard using a drag-and-drop operation.
The sample digital dashboards in the resource
kit feature a separate interface for administrators. Using the Administration
dashboard, you can manage the digital dashboards in your organization. The
Administration dashboard has links to customization pages similar to those that
users see. For more information about the Administration dashboard, see
“Managing Web Parts and Digital Dashboards” later in this paper.
This section lists terms that are specific to
the Digital Dashboard Resource Kit 2.0. To use this paper fully, you should
read this section before continuing.
Digital dashboard: The rendering of a set of Web
Parts in an HTML page.
Digital dashboard application: A digital dashboard plus all support pieces, customization pages,
and Web Parts.
Digital dashboard factory: A set of ASP, XML and
XSL files that assemble Web Parts into a view layout suitable for rendering in
a dashboard.
SQL Server Web Part database: A SQL Server database (version 7.0 or later) that stores dashboard
and Web Part definitions and properties.
SQL Server Web Part server: An Internet Information Services (IIS) extension that serves as an
access layer between the database and IIS. This access layer transforms all
calls that retrieve, update, and store definitions into a format that the
underlying SQL Server engine can interpret.
Web Part: A
digital dashboard component that can contain any type of Web-based content. Web
parts have properties that you can set to control their appearance and
functionality.
Web Part catalog: A library of Web Parts
located on the Internet or a local intranet. Users can add Web Parts to their
dashboards by importing them from Web Part catalogs.
You’ll need to make a number of key decisions
before you deploy digital dashboards in your organization. One of the most
important is choosing a store for your Web Parts and dashboards.
A digital dashboard offers native support for
three types of stores: Microsoft Exchange 2000 Server, the Microsoft Windows
2000 file system, and Microsoft SQL Server. You can also use a mixed storage
model, but this requires a custom dashboard factory.
Each type of store offers different benefits,
which the following table describes.
|
Platform
|
Benefits
|
|
Microsoft Exchange 2000 Server
|
·
Microsoft’s Strategic digital dashboard
platform
·
Native WebDAV support makes administration and
maintenance straightforward
·
Integrated with Microsoft Office
·
Integration with Active Directory™ enables
sophisticated management of users and groups
|
|
Windows 2000 File System
|
·
Native WebDAV support makes administration and
maintenance straightforward
·
Familiar and easy to manage
|
|
Microsoft SQL Server
|
·
Scalable application platform
·
WebDAV support
·
Sophisticated relational user, Web Part, and
dashboard management
|
|
Mixed Storage
|
By creating a custom dashboard factory, you
can use a mixed storage model that combines the benefits of the various
storage platforms. The Digital Dashboard Resource Kit does not include mixed
storage samples.
|
The Digital Dashboard Resource Kit includes two
sample dashboards—one for the Windows file system and one for SQL Server. When
the final version of Exchange 2000 Server is available, Microsoft will make the
Exchange 2000 Server digital dashboard sample available on the Internet. Each
sample has a different set of native characteristics, but you can customize
these dashboards to better meet the needs of your organization. Keep in mind
that one of the key issues in choosing a store is the skill sets of the
administrators in your organization. The following sections describe the
characteristics of each storage engine in detail.
The simplest digital dashboard to understand,
run, and modify is the Windows file system sample dashboard because it uses
many of the conventions of an ordinary Web site. This sample was designed as a
companion to the Web Part Builder and is a great test platform for Web Part
developers. The Windows file system sample dashboard is also a great learning
tool for administrators and an excellent platform to use for smaller
deployments.
The SQL Server digital dashboard sample is an
excellent starting point from which you can create scalable, enterprise-ready
digital dashboards. Because SQL Server is a relational
database management system, it offers certain advantages as a Web Part store.
For example, users’ settings for each dashboard are stored in a set of
relational tables, which allows different users or groups to type the same URL
and see customized portals.
Exchange 2000 Server is an excellent platform
for companies that want to increase worker collaboration through the use of
collaborative tools and applications. Because Exchange 2000 Server provides
native integration with Microsoft Office, it is an ideal platform with which to
create digital dashboards that incorporate the analytical capabilities of
Office applications. In addition because Exchange is integrated with Windows
2000 Server Active Directory service, you can manage users and groups simply
and easily. The Exchange 2000 Server digital dashboard sample will be available
on the Internet in the fall of 2000.
This section describes the process of installing
the sample dashboards included in the Digital Dashboard Resource Kit 2.0.
Because these dashboards are samples, they have default out-of-the-box characteristics.
However, you can easily tailor the sample dashboards to meet the needs of your
organization.
The Windows 2000 file system sample dashboard
stores Web Parts and digital dashboards in the Microsoft Windows 2000 file
system. These components are stored in folders that have a special set of
WebDAV properties identifying them as Web Part and digital dashboard folders.
You must install the Windows 2000 file system
sample dashboard on a computer running Windows 2000 Server and IIS 5.0.
Note The computer and drive on which you install the
sample dashboard must be formatted with NTFS.
To install the Windows file system sample
dashboard, choose Install the File System Sample Digital
Dashboard from the Building Digital Dashboards page of the Digital
Dashboard Resource Kit. You can also run DDRK_FS.msi from the CD- ROM. An
installation wizard guides you through the installation process.
During installation, the wizard will prompt you
for the following information:
·
The name of the folder or virtual root that will
hold your users’ digital dashboards. The default virtual root is Dashboards.
·
The name of the virtual Web root that contains
the Dashboard factory. The default virtual Web root is Factory.
Setup also copies the following files to your
computer.
|
Files
|
Description
|
|
\Factory\*.*
|
The dashboard factory, a set of files that
support dynamic rendering at run time. During installation, these files are
copied to a \inetpub\wwwroot\dashboard folder.
A virtual directory with Execute and Write
permissions is created based on this folder. The name of this virtual directory
is Dashboard. You reference this virtual directory when you access your
dashboard through a browser.
|
|
\Dashboards\
|
The Welcome and Administration dashboards.
Also the default location for users’ dashboards.
|
The SQL Server sample
digital dashboard stores Web Parts and digital dashboards in a SQL Server
database. This sample dashboard includes a special IIS extension supporting the
HTTP 1.1 and WebDAV methods that handle HTTP requests for dashboard contents
that are compatible with Exchange Server and Microsoft Office.
Before you install
the SQL Server sample digital dashboard, you should create an empty SQL
database to store your dashboard resources. During installation, Setup adds
tables, stored procedures, and triggers to the database you specify.
You must install the
SQL Server sample digital dashboard on a computer running SQL Server version
7.0 or later, Windows 2000 Server, and IIS 5.0. The SQL Server Web Part catalog
server, the catalog database, SQL Server, and IIS must reside on same computer.
You cannot distribute these components across multiple computers.
To install the SQL
Server sample digital dashboard, Choose Install the Microsoft
SQL Server Sample Digital Dashboard from the Building Digital Dashboards
page of the Digital Dashboard Resource Kit. You can also run DDRK_SQL.msi from
the CD-ROM. An installation wizard guides you through the process.
During installation,
the wizard will prompt you for the following information:
·
The name of the SQL Server and an authentication
mode.
·
The name of the Web root that users will use to
attach to a dashboard. The Dashboard Factory files will be stored in the Web
root that you specify. The default virtual root name is Dashboard, on the
default Web Site server.
·
The name of the Web root that will be used to
access the catalog. The default name is sqlwbcat.
·
The name of the database. You must specify an
existing database.
Your responses are recorded in the IIS Metabase
and used by the catalog server to locate the dashboard and database. If you
modify virtual root directory names, or the database name and location, you
should reinstall your software to update the IIS Metabase settings.
If you need to reinstall the SQL Server sample
digital dashboard, be sure to remove the prior installation first. Use Remove All in the Add/Remove Programs
utility in Control Panel.
Setup also copies the
following files to your computer.
|
Files
|
Description
|
|
\scripts\sqlwbcat.dll
|
The SQL Server Web Part catalog server. During
installation, this file is copied to the \inetpub\wwwroot\scripts folder and
registered in the IIS Metabase.
|
|
\dashboard\*.*
|
The dashboard factory. This is a set of files
that support dynamic rendering at run time. During installation, these files
are copied to a \inetpub\wwwroot\dashboard folder (or to another subfolder
name that you specify).
|
After you install one of the sample dashboards,
you will see a Welcome dashboard and an Administration dashboard. You can use
the Administration dashboard to create a new digital dashboard application and
set its properties. After you’ve created a new digital dashboard, you can add
Web Parts by building new Web Parts or downloading existing Web Parts and
adding them to your digital dashboard.
To create a new digital dashboard application:
1.
From the Administration dashboard, click New.
2.
In Dashboard Properties,
specify any or all of the following properties:
·
In Name, type a name for
the new dashboard.
·
In Title, type a title
for the new dashboard.
·
In Description, type a
brief description of the dashboard.
3.
Click Save to save your new dashboard.
There are also a number of extended properties
that affect the look and feel of your new dashboard. For additional information
about dashboard properties, see “Customizing a Digital Dashboard” later in this
paper.
After you create a dashboard, you can tailor its
functionality by adding Web Parts.
You can add Web Parts to a digital dashboard in
four ways:
·
End users can use the dashboard’s built-in
customization pages to create a simple Web Part.
·
Administrators can use the built-in
customization pages of the Administration dashboard.
·
End users and administrators can use the
dashboard Web Part Catalog Listing page to import existing Web Parts from a
corporate catalog.
·
Developers can use the Web Part Builder, a
Microsoft Visual InterDev® add-in included in the Digital Dashboard Resource
Kit 2.0, to create a complex Web Part.
The following section walks you through the
process of adding Web Parts using each of these methods.
In this example, you’ll use the customization
pages of the dashboard application itself to build a Web Part that displays the
MSN™ home page and add it to your digital dashboard.
When you create a new Web Part, you specify
properties that determine basic metadata, such as a title and description for
the Web part; appearance properties that define height and width of the Web
Part and where it appears on the dashboard; and content properties that specify
the type of content the Web Part contains and its source. You do not need to
define every property. To create a Web Part using the digital dashboard
customization pages:
1.
From the dashboard, click the Content
button in the upper-right corner.
The Content customization page appears.
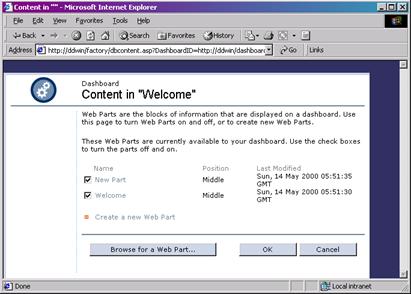
2.
Click Create a New Web Part.
The Properties for “New Part” page appears.
3.
In the General Settings
section, in Name, type MSN, which is the title
the Web Part displays in the dashboard.
4.
Navigate through the rest of the General Settings section, and specify the following:
·
A description of the Web Part; for example, This Web Part displays the MSN home page.
·
Whether you want the Web Part included on the
dashboard. For this example, select the Include this Web Part
on the dashboard check box.
·
The position of the Web Part on the dashboard.
·
Whether the Web Part should be displayed in a
frame.
·
Whether the default state of the Web Part is
expanded or minimized.
·
The width and height of the Web Part.
Note If you do not specify a height and width for the
Web Part, the Web Part will expand to fill the space available.
5.
Click the Advanced Settings link to
navigate to the page in which you will set the Web Part’s content properties.
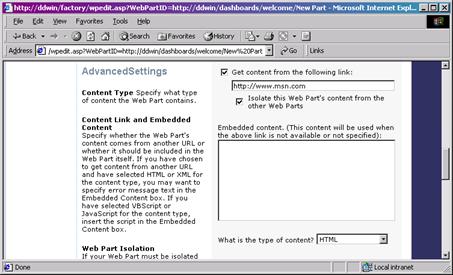
6.
In the Advanced Settings
section, in Link to Content, type http://www.msn.com.
7.
Select the Isolate this Web Part’s content
from the other Web Parts check box, and then click OK.
Note Always isolate your Web Part when it contains
content from a URL on the Internet. This eliminates the possibility of name
collisions between various items on the dashboard.
You can now see the new Web Part in your dashboard.
When you use the Web Part Listing page, you
import an existing Web Part from a catalog that’s located on your intranet or
on the Internet. As the
administrator of the digital dashboards in your organization, you will use a
Web Part catalog to store Web Parts that users can add to their dashboards. You
can use the Web Part Builder included in the Digital Dashboard Resource Kit to
build Web Parts and import them into the Web Part catalog and export them from
the catalog.
To add a Web Part using the Web Part Listing
page:
1.
From the dashboard, click the Content
button in the upper-right corner.
2. Click the Browse for a Web Part button.
3. Select the Web Parts you
want to import, and click Import.
Developers can use the Visual InterDev add-in
included with the Digital Dashboard Resource Kit to create Web Parts that are
more complex. You must install the Web Part Builder on a computer running
Windows 2000 and Microsoft Visual InterDev 98. This section walks you through
the process of creating one of the most common Web Parts on a digital
dashboard—a Web Part that displays the contents of a user’s Inbox. For more
information on installing the Web Part Builder, see the Web Part Builder
Documentation in the Digital Dashboard Resource Kit.
Before you create this Web Part, do the
following:
·
Connect to the root Web of a Windows 2000 file
system digital dashboard site with Visual InterDev.
·
Make sure the Outlook® View Control is installed
on your computer.
For information on how to connect to a digital
dashboard site and create the necessary folders, see the Web Part Builder
documentation included in the Digital Dashboard Resource Kit.
To build a Web Part that displays a user’s
Inbox:
1.
Right-click the Dashboards
folder in the project view, and select Add a Dashboard folder.
2.
Type a name and a title for the new dashboard
folder.
3.
Right-click your new dashboard folder, and then
select Add Web Part.
4.
In the Create Web Part
dialog box, type a name and description for the Web Part, and then for the
content type, select HTML.
5.
Add the Outlook View Control to your Toolbox:
from the Tools menu, select Customize Toolbox and select the Microsoft Outlook View Control check box.
6.
Drag the Outlook View Control onto your new Web
page.
7.
From the File menu, select Save.
To see how the Web Part looks in the dashboard,
right-click the Dashboard folder and select View Dashboard.
After you have created a dashboard application,
you can customize it by modifying its properties. You do not have to define all
properties for a given dashboard.
Properties that you do not define use default values.
The
digital dashboard samples include Administration dashboards that allow you to
modify the properties of the dashboards on your server. You can also customize
a digital dashboard from the dashboard itself by clicking the Settings button; however, if you are customizing a large
dashboard site, this is a less efficient method than using the Administration
dashboard.
This
section outlines the customization options that are available to you and your
users. They include:
·
Modifying
the basic properties of the dashboard, such as its title and name.
·
Changing
the appearance of the dashboard by using a custom style sheet or pre-defined
styles sheet and adding a corporate logo.
·
Creating
sub-dashboards and adding images to the navigation bar that represent those
dashboards.
The following sections
describe how to set digital dashboard properties using the sample
Administration dashboard.
You set the properties for the digital
dashboards in your organization using the Administration dashboard. Users can
customize the properties of their dashboards using the Dashboard
Settings customization page.
To customize a the basic properties of a digital
dashboard:
1.
In Dashboard Navigation,
select the digital dashboard whose properties you want to modify, and then
click Settings.
2.
In Dashboard Properties,
modify either or both of the following:
·
In Name, type a new name
for the dashboard.
·
In Title, type a new
title for the dashboard.
3.
When you have finished setting properties, click
Save.
It’s easy to change the look and feel of the
sample dashboards. You can customize them to display your company’s logo,
colors, and fonts, or you can use one of the predefined styles that are
included with the sample dashboards.
When you install one of the sample dashboards,
you have five predefined styles to choose from:
·
Standard—white background, black
text, blue header and accents.
·
Arctic—white background, black
text, light blue header and accents.
·
Desert—white Background, black
text, sand header.
·
Midnight—black background, white
text, dark blue header and accents.
·
Tropical—tan background, black
text, medium blue header with light orange accents.
When you apply one of these predefined styles,
all Web Parts on the page inherit that style unless a Web Part author has
chosen to override the style sheet by applying custom styles to a specific Web
Part.
To choose a predefined style:
1.
In Dashboard Navigation,
select the digital dashboard whose style you want to modify, and then click Settings.
2.
In Style, select Use a predefined style:, and then select a style from the drop-down list.
3.
Click Save to apply your changes.
You can add styles or edit the existing ones to
match your corporation’s color scheme. This default style sheet is called
Standard.css. You can find it in the dashboard factory folder and edit it using
Visual InterDev.
If
you don’t want to use one of the predefined styles or edit the Standard.css
file, you can use the Dashboard Settings customization page to
supply a link to an external style sheet.
To link to an external style sheet:
1.
In Dashboard Navigation,
select the digital dashboard whose style you want to modify, and then click Settings.
2. Select the check box Apply a style based on the following style sheet:, and in the
accompanying text box, type a URL that points to the custom style sheet you
want to use.
3.
Click Save to apply your changes.
If you choose, you can add a header image to
your digital dashboard; for example, you may all dashboards in your
organization to display your corporate logo. Use an image that is at most 105
by 30 pixels. You can use any image format that will render in the browser,
such as a .jpg or .gif.
To add a header image:
1.
In Dashboard Navigation,
select the digital dashboard to which you want to add a header image, and then
click Settings.
2. In the text box Use the following image in the header:, type a URL that points
to the header image you want to use.
3.
Click Save to apply your changes.
You can nest related dashboards and set
properties that allow users to navigate between them. The dashboard user
interface displays sub-dashboards in a navigation bar that appears under the
dashboard header.
To display sub-dashboards:
1.
In Dashboard Navigation,
select the digital dashboard to which you want to add sub-dashboards, and then
click Settings.
2. Next to Show Nested Dashboards, select one of the radio buttons to
indicate whether this dashboard should show nested dashboards.
3. In Navigation Order:, type a number to represent this dashboard in the
hierarchy of nested dashboards.
4. Click Save to apply your changes.
After
you add a number of dashboards you may want add an image to represent each
sub-dashboard. Use images that are 16 by 16 pixels. You can use any image format that will render in the browser, such
as a .jpg or .gif.
To
add a navigation image that represents the dashboard:
1.
In Dashboard Navigation,
select the sub-dashboard to which you want to add a navigation image, and then
click Settings.
2. In Navigation Image, under Use the following
image to represent this dashboard:, type a URL that points to the image you
want to use to represent this dashboard in the navigation bar.
3.
Click Save to apply your changes.
4.
Repeat steps 1 through 3 for each sub-dashboard
that appears in the navigation bar.
If you run digital dashboards as folder home
pages within Outlook, users can access their dashboards from within the
familiar Outlook environment. Running a digital dashboard within Outlook
provides offline capabilities and allows developers to access the Outlook
object model to create sophisticated collaborative dashboards.
Outlook Today hosts a special version of
Internet Explorer that has a smaller feature set than Outlook Folder Home
pages. To run the digital dashboard samples in Outlook Today, you must change
an entry in the Windows registry to enable customization of the dashboard. You
can use the full version of Internet Explorer to display Outlook Today by
adding the following two settings to the registry:
[HKEY_CURRENT_USER\Software\Policies\Microsoft\Office\9.0\Outlook\Webview\mailbox]
"url"=<http://digidash/home.htm>
(Type the location of your digital dashboard here.)
"navigation"="yes"
To run a digital dashboard within Outlook:
1.
In Outlook, create a new folder called Dashboard.
2.
Right-click the new folder, select Properties, and then click Home Page.
3.
Under Address:, type the
URL that points to the dashboard you want this folder to display, as shown in
the following illustration.
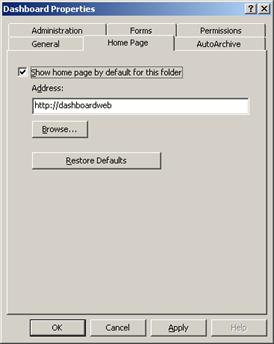
4.
Select the Show home page by
default for this folder check box, click Apply,
and then click OK.
Once you have configured a digital
dashboard to run as a folder home page, it is easy to mark the dashboard for
offline use. Configuring a folder so that users can take it offline is a simple
two-stage process.
Integration between Outlook and the
Internet Explorer Synchronization Agent enables users to see Internet and
intranet content offline through folder home pages. After synchronizing
Exchange Server content, Outlook launches the Internet Explorer Synchronization
Agent. Because all Web pages are stored in the same cache, they are available
through both Internet Explorer and Outlook.
This feature is extremely powerful. Not
only does the Internet Explorer Synchronization Agent make it possible for you
to configure Web pages that users can take offline, but you can also specify
that the offline content include lower-level, supporting pages. By setting up
folder home pages correctly, you can build a variety of interesting offline applications
that merge Internet, database, and collaborative information.
To configure a folder for offline use:
1.
Right-click the folder you would like make
available offline (in the earlier example it was Dashboard), and then
click Properties.
2.
Click the Synchronization tab.
3.
Select the When Online or Offline radio
button.
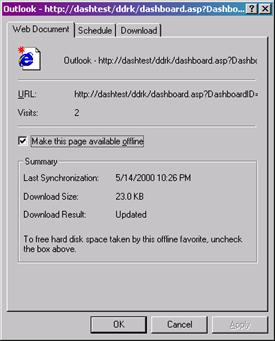
4.
Click the Home Page tab,
click Offline Web Page Settings, and then select the Make this page available offline check box, as shown in the
following illustration.
5.
Click the Download tab, and in Content to download, select at least two levels of links to
follow to get the best offline experience.
6.
You may also select either or both of the
following options:
·
Whether to follow links outside of this page’s
Web site.
·
A limit on the hard disk space this page can
consume. When you are finished the dialog box should look the one in the
following illustration.
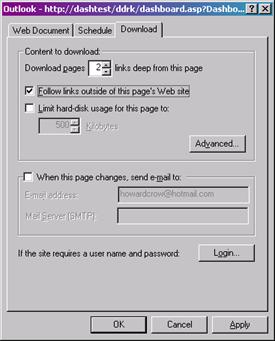
7.
If you want a notification sent to a user
when the page changes, select the When this page changes, send
e-mail to: check box, and then type the user’s e-mail address and server
name in the accompanying text boxes.
8.
If the site requires a user name and
password, click Login, type the user’s login
credentials, and then click OK.
9. When you are finished configuring the Web page for offline use,
click Apply, and then click OK.
Note If you are experiencing problems with your network
connection, the Web page synchronization may time out, resulting in particular
pages not being synchronized. If problems occur during synchronization, a small
icon appears in the task bar.
You can use the Administration sample dashboard to perform most of
the basic operations of managing a dashboard site, including:
·
Creating and deleting dashboards and Web Parts
·
Setting properties on dashboards and Web Parts
·
Setting permissions on dashboards and Web Parts
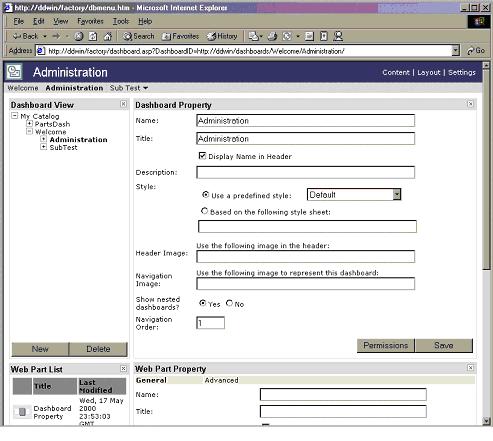
The Administration sample dashboard consists of four Web Parts:
·
Navigation Pane
·
Properties Pane
·
Web Part Chooser
·
Web Part Properties
When you select a dashboard in the navigation pane, the properties
pane displays its properties. The Administration dashboard features links to
customization pages that are similar to those that an end-user sees. The
following illustration shows the SQL Server sample Administration dashboard.
You can also use Web folders to perform basic
administrative tasks. You can navigate through Web folders to see what items
are available, and you can double-click an item to open it in a browser window.
In addition, right-click commands allow you to rename, move, or delete items in
the SQL Server Web Part catalog database and the Windows file system. However,
you cannot create new dashboard folders or Web Parts through this interface.
To access Web folders:
1.
From the desktop, double-click My
Network Places.
2.
Double-click Add New Network
Place.
3.
Type the URL to the dashboard site; for example,
http://MyServer/Dashboards.
When deploying digital dashboards, one of the
most common issues that administrators face is how to configure dashboards to
supply information tailored to the roles of various users in the organization.
For example, an executive needs access to information that is very different
from what a salesperson or a shop foreman needs. Some Web Parts designed for
executives should be inaccessible to a majority of users, but at the same time,
there are Web Parts that everyone needs, such as a Web Part that displays
company announcements.
When a user or administrator modifies the
properties of a dashboard or Web Part, the dashboard factory writes those
settings back to the store. For this reason, security is an essential
consideration.
A digital dashboard is an Intranet application
that is fully integrated with Windows 2000 Internet and file system security.
You configure digital dashboard security by setting Access Control Lists (ACLs)
on the underlying store. This allows you to control security for individuals
and groups in addition to Web Parts and dashboards. Integration between the
stores and Active Directory allows you to link group and user permissions to
the core company directory.
The following sections describe the two-step
process of configuring security for digital dashboards.
The first step in setting security is choosing
an authentication method to verify the identity of users requesting dashboards.
Both the SQL Server and file system sample dashboards use Windows NT® security
for authentication. The sample dashboards support the following methods:
Anonymous
log-ins Enabling anonymous
log-ins is not recommended. For the file system dashboard, if you enable
anonymous log-ins, the dashboard factory ASP files run under a process logged
in as IUSR_SERVER. IUSR is not a trusted account and therefore, cannot write
changes to the dashboard back to the server. To run a digital dashboard with
anonymous log-ins, you must enable write permissions for the IUSR_SERVER user
on the underlying dashboard factory and Dashboards folder, which creates a
security hole. In addition, because every user is logged in under the same
account, IUSR, users cannot personalize their dashboards.
Windows
2000 Authentication This is the
recommended authentication method for both the SQL Server and Windows file system
sample dashboard. When you install the sample dashboards, Windows 2000
Authentication is turned on by default. Using Windows 2000 Authentication gives
you a significant level of control over dashboard access; for example, you can
control user and group access to specific dashboards (both read and write) by
setting security on the underlying folders.
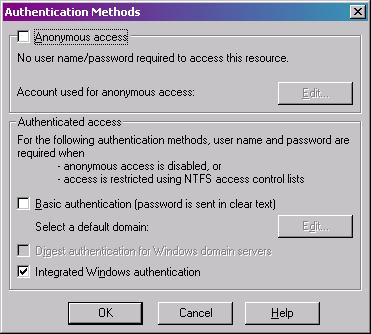
To configure an
authentication method for the sample dashboards:
1.
Start Internet Service Manager: from the Start menu, point to Settings, click Control Panel, double-click Administrative
Tools, and then double-click Internet Service Manager.
2.
In the left pane, right-click the virtual root,
click the Properties tab, and then select Directory Security.
3.
Make sure that the Integrated
Windows Authentication check box is selected, as shown in the following
illustration.
4.
Click OK to apply the
authentication method.
Digital dashboards are designed to honor
security on the underlying dashboard folders and Web Parts. Once a user is authenticated,
the dashboard factory runs on the server under the security profile of the
user. By setting security on dashboard folders and Web Parts, you can prevent
users from seeing dashboards and Web Parts to which they should not have
access.
Windows 2000 File System Sample Dashboard
In the Windows 2000 file system sample digital
dashboard, there are three fundamental sets of user permissions for dashboards
and Web Parts:
·
No Access—the user cannot see the dashboard or Web Part. This maps to a user
being denied both read and write access to the item in the file system
·
Read Only—the user can see the dashboard or Web Part but cannot modify it.
This maps to the user having read access to the item in the file system
·
Modification—the user can create and edit the Web Part or dashboard. This is
equivalent to the user having read and write access to the item in the file
system
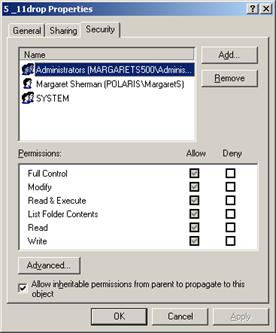
To set security for the Windows 2000 file system
sample dashboard:
1.
In the Windows file system, right-click the Web
Part or dashboard folder on which you want to set security, and then select Properties.
2.
Click the Security tab,
and then do one or both of the following:
·
Add users and groups: click Add,
and then select the users and groups to which you want to give permissions.
·
Remove users and groups: click Remove,
and then select the users and groups who currently have permissions on the
folder that you want to remove.
3.
Under Permissions, allow
or deny permissions to the users and groups you’ve chosen by selecting the
appropriate check boxes, Click Apply, and then click OK to apply the permissions you just configured.
Note If the folder on which you are setting permissions
is a subfolder, and you want the permissions of the parent to propagate to this
folder, select the Allow inheritable permissions from parent
to propagate to this object check box.
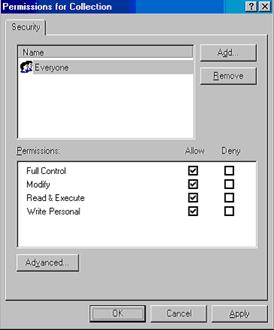
SQL Server Sample Dashboard
In the SQL Server sample digital dashboard,
there are four fundamental sets of user permissions for dashboards and Web
Parts:
·
Full Control—the user has full control for the dashboard or Web Part. This means
that a user has the ability to read, write, delete and change permissions for
the item. When the SQL Server sample dashboard is initially installed, all
users are given full control.
·
Modify—the user can read, write, and modify the Web Part or dashboard.
This is equivalent to the user having read and write access to an item in the
file system.
·
Read & Execute—the user can see the dashboard or Web Part but cannot modify it.
This is equivalent to a user having read access to an item in the file system.
·
Write Personal—the user can personalize the dashboard or Web Part. Personalization
is described in “Deploying the Sample Digital Dashboards”.
If you have installed the SQL Server sample
dashboard, you can configure security for dashboards and Web Parts from the
Administration dashboard. To configure security from the SQL Server
Administration dashboard:
1.
In the Dashboard Navigation pane, select the
dashboard for which you want to configure security.
2.
In the Dashboard Properties pane, click Permissions. The Permissions dialog
box appears, as shown in the following illustration.
3.
Add or remove users and groups by doing the
following:
·
To add users or groups, click Add,
and then select the users or groups to which you want to give permissions.
·
To remove users or groups: click Remove, and then select the users or groups who currently
have permissions on the dashboard that you want to remove.
4.
Click Apply, and then
click OK to apply the permissions you just configured.
To configure permissions for Web Parts using the
SQL Server Administration dashboard:
1.
In the navigation pane, select the dashboard
containing the Web Part for which you want to set permissions, and then click Content.
2.
On the Content
customization page, in the Current Web Parts section,
click the title of the Web Part for which you want to set permissions.
3.
On the Web Part Properties
page, click Permissions. The Permissions
dialog box appears.
4.
Add or remove users and groups by doing the
following:
·
To add users or groups, click Add,
and then select the users or groups to which you want to give permissions.
·
To remove users or groups: click Remove, and then select the users or groups who currently
have permissions on this dashboard that you want to remove.
5.
Click Apply, and then
click OK to apply the permissions you just configured.
This sections outlines ways in which you can use
the sample dashboards included in the Digital Dashboard Resource Kit to create
your own enterprise-wide solutions.
The file system digital dashboard is intended
for smaller deployments in which ongoing management is not a critical issue.
This sample dashboard is designed primarily for developers who need a platform
on which to build and test Web Parts. However, it is simple to manage small
deployments with this type of dashboard because you can manipulate dashboard
and Web Part folders in the file system. Two deployment scenarios work
particularly well with file system digital dashboards: the static portal and
the template dashboard.
Static Portal
In a static portal scenario, the administrator
group has total control over the look and feel of the dashboard. As the
administrator, you create the dashboard, Web Parts, and all sub-dashboards.
Users have access to the portal and all information but cannot customize the
dashboard. Although this can be a drawback, you can easily set up multiple
dashboards very quickly for different groups within your company.
To set up this type of digital dashboard
deployment, create a dashboard or set of dashboards using the Administration
dashboard. Then, set the permissions on the dashboards to give users Read-Only
access. Give the administrator group full access to allow them customize the
dashboard remotely.
Template Dashboard
The template scenario allows each user to have
his or her own dashboard, which is based on a template dashboard application.
Keep in mind, though, that if you have a large number of users, your site may
be difficult to maintain using this scenario, because each users has his or her
own dashboard.
Inside the dashboard factory folder there is a
Web page called wwwDefault.asp. The page is an entry point to the dashboard
site, and it is generally saved in the wwwRoot directory. The page captures
users’ Windows authentication information and redirects them to their personal
dashboard folders. When a user visits the site for the first time, the page
copies a template dashboard, which you specify, into a new folder created for
the user. You can edit this template to create new templates, and then you can
allow your users to choose from a list of available templates.
The SQL Server digital dashboard provides a
scalable platform for deploying digital dashboards. SQL Server provides the
ability for administrators to secure dashboards as well as provide the ability
for users to personalize shared dashboards.
Secure Dashboards
As an administrator of a SQL Server digital
dashboard, you can control the extent to which your users can modify their
digital dashboards and Web Parts. The amount of control you give your users
will often depend on the types of dashboards you deploy in your organization;
for example, you will probably want to give users full control of their
personal dashboards but allow users to only modify limited properties on a team
dashboard or a dashboard that displays company news.
Here are some of the options that are available
to you:
·
Complete lock down—in this scenario, you set ACLs to restrict all write permissions to
the administrator group only. Users cannot add or remove Web Parts or modify
dashboard properties. When you deploy a digital dashboard that’s completely
locked down, links to the Layout and Settings pages do not appear in the user
interface. The link to the Content page is still present, but on the Content
page users can only see a list of Web Parts: they cannot import or delete Web
Parts or modify their properties.
·
Users can view Web Parts in a dashboard
based on role—in this scenario, you use read
ACLs to limit who can access certain Web parts in a given dashboard. This way,
you can create a dashboard with a large number of Web Parts and then control
which users can see specific Web Parts in their dashboards; for example, the
executives in your company would see a different set of Web Parts than the
salespeople. If a user does not have permission to access a specific Web Part,
that Web Part does not appear in the list of Web Parts on the Content page.
·
Users can customize Web Parts
but cannot import or delete them—in this
scenario, you use ACLs that control whether users can insert or delete rows in
the SQL Server catalog database. The Web Parts on the dashboard are locked
down, but users can still customize the look and feel of the Web Parts and the
dashboard. If users cannot import or delete the Web Parts on a dashboard, the
Content page does not display a list of available Web Part catalogs.
·
Users have full control—in this scenario, you use ACLs to give users full control over a
dashboard. Users can import and delete Web Parts and modify the look and feel
of the dashboard by setting Web Part and dashboard properties.
Personal Dashboards
The SQL Server
digital dashboard supports a flexible personalization scheme that that allows each user to configure dashboards, Web Parts, and
related content. Personalization is supported through user-specific properties
the user sets and the server maintains in the SQL Server catalog database. When
a user first accesses a dashboard, an entry is automatically made for that user
in a profile table,
which subsequently stores any custom property settings the user defines. If the
user does not personalize the dashboard, the storage is unused.
When a user requests
a dashboard for the first time, a set of default properties determines its
appearance and functionality. After that, customized properties are applied
when the page is rendered, overriding the default properties that are defined
for the catalog item. If a user’s profile definition is unavailable, the
default properties are used. If a developer or administrator changes the
default global property set, those changes do not affect the personalized
settings the user makes. Only security settings or functionality changes
override the personalization layer of a digital dashboard environment.
Not all properties can be personalized. In
addition, to be able to personalize a digital dashboard, the user must have the
appropriate permissions. For more information about customizable properties,
see the “Web Part Schema” and “Dashboard Schema” reference documents provided
in this release.
The information
contained in this document represents the current view of Microsoft Corporation
on the issues discussed as of the date of publication. Because Microsoft must
respond to changing market conditions, it should not be interpreted to be a
commitment on the part of Microsoft, and Microsoft cannot guarantee the
accuracy of any information presented after the date of publication.
This document is
for informational purposes only. MICROSOFT MAKES NO WARRANTIES, EXPRESS OR
IMPLIED, IN THIS DOCUMENT.
© 1999 Microsoft
Corporation. All rights reserved.
Microsoft, ActiveX, BackOffice, MSN,
Outlook, PivotChart, PivotTable PowerPoint, Visual InterDev, Visual Studio,
Windows, and Windows NT are either registered trademarks or trademarks of
Microsoft Corporation in the U.S.A. and/or other countries.
Other company and
product names mentioned herein may be the trademarks of their respective
owners.
The names of companies, products, people,
characters, and/or data mentioned herein are fictitious and are in no way
intended to represent any real individual, company, product, or event, unless
otherwise noted.