Introduction to Collaboration
Customers around the world have made a significant investment in Microsoft Exchange for the messaging platform. The chose Exchange because it offers the scalability, reliability, performance and security they require for their enterprise messaging. They also chose it because it provides an ideal platform for creating collaborative applications.
A collaborative application is an application that makes it easy for individuals and teams to share information and work together on projects. Because collaborative applications help users communicate and work together more effectively they must run across a network. It only makes sense to take advantage of the existing messaging infrastructure, which was implemented to facilitate communication.
Microsoft Exchange and Microsoft Outlook make it easy for users to create collaborative applications that take advantage of your existing messaging infrastructure. And best of all is that you can create these applications without any programming.
In this evaluation guide you will learn how to create the most popular collaborative applications, without writing a single line of code.
Getting Started
Installing Microsoft Exchange Server
This guide assumes that Microsoft Exchange Server is being set up for the first time in a stand-alone environment for evaluation purposes. For more information regarding Microsoft Exchange Server components, see the Books Online that will be available after you install Microsoft Exchange Server version 5.5.
You can use this guide to:
1. Set up and use the Microsoft Outlook™ client for e-mail, calendaring and scheduling, and creating collaborative applications without programming.
2. Use Outlook Web Access for e-mail, schedule, discussion groups, and Address Book access.
3. Set up a discussion group that can be viewed by any the Outlook client, Outlook Web Access, or Network News Transfer Protocol (NNTP) client.
Server System Requirements
For Intel and compatible systems:
· Pentium 90 or faster processor; Pentium 133 recommended
· 32 MB of RAM; 64 MB recommended
· 500 MB of disk space
· CD-ROM drive
The following software must be installed and running on the computer that will run Microsoft Exchange Server software:
· Microsoft Windows NT Server 4.0 with Service Pack 3 (SP3) and Microsoft Internet Information Server version 4.0 are required to use Microsoft Active Server Components, which allows you to use Outlook Web Access for email, scheduling, and discussion. IIS 4.0 is found in the Windows NT Server 4.0 Option Pack.
· To check for the presence of SP3 on Windows NT, choose About from the Help menu in Explorer.
Basic Microsoft Exchange Terminology
Organization name The name of the organization in which Microsoft Exchange is being installed. For example, at Microsoft, the organization name is Microsoft.
Note: Once you specify an organization name, it cannot be changed without reinstalling Microsoft Exchange Server.
Site name The name given to a number of servers which have been grouped together logically (for example, by location or functional area). For example, all servers used at Microsoft corporate headquarters are part of the site named REDMOND.
Server name The name of the individual servers within a site. The server name is the same as the name you specified during Windows NT Server installation.
Note: Once you specify a site name, it cannot be changed without reinstalling Microsoft Exchange Server. For more information about site planning consideration, see the Planning and Deployment section on http://www.microsoft.com/exchange/
Windows NT Service Account A Windows NT Server account that Microsoft Exchange Server uses to log on to Windows NT Server as a service. By default, Microsoft Exchange Server uses the same account that you logged on to during Setup.
Microsoft Exchange Server 5.5 Installation
For more information regarding Microsoft Exchange Server, see the Books Online that will be available after you complete Microsoft Exchange Server 5.5 Setup.
· A personal computer with Microsoft Windows NT Server 4.0 and SP3 or later (detailed installation instructions are on the compact disc in the Readme file)
· A Windows NT user account named Exchange Service with a password of “service”
· The name of your Windows NT Server
· Microsoft Internet Information Server 4.0
Note: Some Windows NT or other program services may need to be temporarily stopped during the installation process. If prompted, choose OK to stop these services temporarily.
Setup:
1. Log on to the Windows NT Server as Administrator.
2. From the Microsoft Exchange Server compact disc, run Setup. exe.
3. In the Microsoft Exchange Server Setup dialog box, choose OK to start the installation process.
4. Choose the Complete/Custom for the installation that includes the online books.
5. Make sure all listed options are selected, and then choose the Continue.
Licensing:
1. Select the box labeled, I agree that.
2. In the Organization and Site dialog box, select Create a new Site.
3. In the Organization name and Site name boxes, type the name of your organization and site, and choose OK.
4. When asked if you are sure you would like to create a new site, choose Yes.
Specifying the Site Service Account:
1. Under Account name, select the Exchange Service.
2. Enter the Exchange Service account password, service, and then choose OK.
3. Microsoft Exchange Setup will grant this account additional rights. choose OK.
4. When prompted to run the Microsoft Exchange Server Optimizer, choose Exit Setup.
A Windows NT Server user account is required for each mailbox in Microsoft Exchange Server. If you try to create a mailbox for which there is no associated Windows NT user account, Microsoft Exchange Server will ask you to designate an existing account or create a new one.
Note: If you are not in the Recipients container, a dialog box appear stating: “Recipients cannot be created in the selected parent container. Do you want to switch to the Recipients Container of the ‘REDMOND’ site?” Choose OK
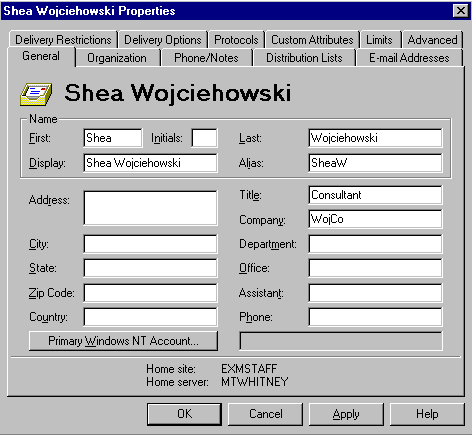
1. From the File menu in the Administrator window, choose New Mailbox.
2. In the First Name box, type your first name; in the Last Name box, type your last name.
3. Choose the Primary Windows NT Account button.
4. Select an existing Windows NT Account, and choose OK
5. Select the Windows NT account Administrator, choose Add, and then choose OK. Using the Administrator account will allow you to switch back and forth between mailboxes throughout the evaluation without stopping and starting your computer. We do not recommend this setup for production Exchange deployments.
6. Choose OK again to complete the creation of a user’s mailbox.
7. Create a second mailbox with a different user name following steps 1-6 above.
Note: If you want to have additional users evaluate Exchange and Outlook you can create separate Windows NT user accounts and Exchange mailboxes for each following these steps.
Figure 1: Mailbox Property Pages
 |
Microsoft Outlook Client Installation
Microsoft Outlook manages e-mail, calendars, contacts, tasks, and to-do lists. It also helps users share information through Microsoft Exchange Server public folders, forms, and Internet connectivity.
· Microsoft Exchange Server 5.5
· The user mailboxes created above
1. Insert Outlook 98 CD into machine.
2. The Active Setup screen should start automatically. If it does not go to the Start button and select Run. Type the drive letter for your CD-ROM drive. Select Setup.
3. Select Install Outlook 98
4. In the first screen select Next
5. Choose I Accept to accept the license agreement. Select Next
6. Fill in your name and organization or company name in the appropriate spaces.
7. For the CD key type 1112-1111111. Select Next.
8. Use the drop down menu to select the type of installation you wish. Standard is default. Full is recommended for the purposes of this evaluation. Select Next.
9. In the Email Upgrade Options page select None of the above. Click Next.
10. Under Email Service Options select Corporate or workgroup. Click Next.
11. Use the default folder install location. Select Next.
12. If asked whether you want to upgrade new items select Upgrade only newer items, then OK.
13. Click OK when Outlook 98 finishes installing. This will reboot your computer.
Creating Profiles in Microsoft Outlook
1. From the Start menu select settings then Control Panel
2. Double click on the Mail icon (this is sometimes labeled Mail and Fax)
3. Select Add
4. Check Microsoft Exchange Server. Be sure that Microsoft Mail and Internet Mail are not checked. Then select next.
5. Enter a name for the profile. For convenience this should be the same as the mailbox name. Select next.
6. Enter the name of the Exchange server. Verify that the mailbox name is correct. Select next.
7. In the next screen you will be asked if you travel with the computer. Check yes. Select next.
8. When asked for the location of the personal address book use the default. Select next.
9. Choose Do not add Outlook to the Startup group. Select next.
10. Select Finish.
11. Setup a new profile for the second mailbox you created above, follow steps 1-10.
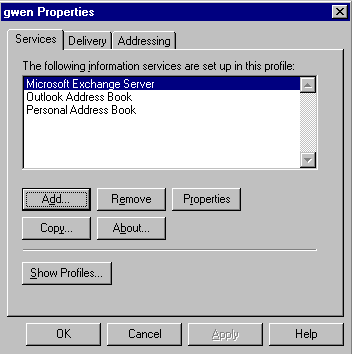 |
Figure 2: Profile properties
Microsoft Outlook Web Access
Outlook Web Access lets you read and send e-mail, participate in discussion groups, engage in group scheduling, and view directory information using a Web browser. Once OWA is enabled, users can access information by using the URL http://<server name>/exchange from the browser.
· Microsoft Windows NT 4.0 (with SP3 or later)
· Microsoft Internet Information Server 4.0
· Microsoft Active Server Components, installed by default as part of IIS 4.0.
· Microsoft Exchange Server 5.5
Microsoft Exchange Active Server Components are installed by default when you choose Complete/Custom during Microsoft Exchange Server Setup. HTTP access is On by default.
1. To access the Microsoft Exchange Server from a browser, go to http://< Server Name>/Exchange.
2. In the logon page, type your mailbox name for access to your mailbox.
Individual Productivity
The combination of Exchange and Outlook allows users to become more productive immediately by enabling rich email, personal and group scheduling, and information sharing. In this section we will show you how to take advantage of each of these features.
Composing and Sending Rich Email Messages:
1. Launch Outlook
2. Under the compose menu select new mail message; or click on the new message button on the far left side of the toolbar.
3. In the To line type your name, making you the recipient. Note that Outlook automatically checks and validates the name, or points out that there are duplicate names in the address book by underlining the name in red..
4. Type a subject in the Subject line.
5. In the Body area type the message.
6. Once the message is complete add rich text by highlighting portions of the message and using the formatting toolbar to select fonts, point size, and colors (using the palate icon).
7. Select Send to deliver the message
8. When you receive the message open it to see the rich text you created when creating the message.
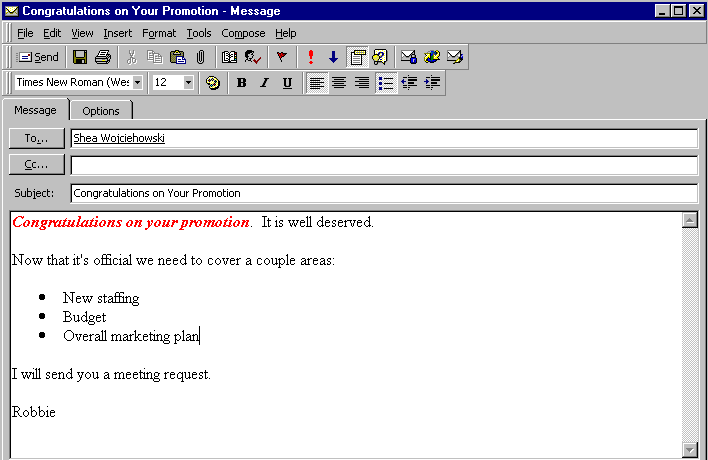
Figure 3: For more impact add rich text to your messages.
Including Attachments
1. Start a new mail message per the instructions above.
2. After composing the message body, select return
3. Click on the attachment icon (the paperclip) on the toolbar. This brings up the Insert File dialogue
4. In the Insert File dialogue use the drop down menu to go to the folder where the item to be inserted resides (e.g., c:\documents, c:\favorites).
5. Highlight the file to be inserted. The select how the item is to be attached—as a document, a link, or plain text. Keep in mind that sending a link requires that the recipient(s) be able to access the item.
6. Select OK. Note the icon in the body of the message.
7. Select send to deliver the message.
8. When you receive the message open it, then double click on the attachment to launch it.
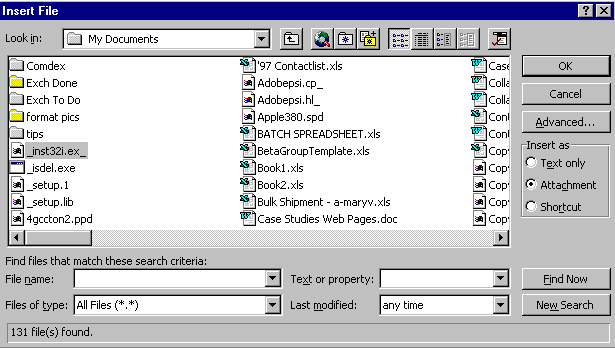
Figure 4: The insert file dialogue allows you to add
attachments to messages.
Setting Priority Level and Message Flags
When messages contain critical information that requires immediate attention, or when they include low priority information, it is useful to note this so recipients can read and respond as appropriate. Therefore Outlook allows users to send messages with a particular priority level attached.
The following steps will show how to send messages with both high and low priority:
1. Compose a message per the steps above. Be sure to either address the message to yourself or include yourself on the cc line.
2. To set an urgent priority click the red exclamation point on the toolbar.
3. Select send to deliver the message. Notice that when you receive your copy there is a red exclamation point in the header denoting high priority.
4. Compose another message, and include yourself on the to or cc lines.
5. Set the priority to low by clicking the blue downward arrow on the toolbar.
6. Select send to deliver the message. Note when you receive your copy there is a blue downward arrow in the header denoting low priority.
Similarly, sometimes messages are time sensitive. In these cases a user can attach a message flag that triggers an alert as a deadline approaches.
To assign a message flag, use the following steps:
1. Compose a message. Be sure to include yourself on the cc line.
2. When finished, click the red flag button on the toolbar (it is located to the left of the urgent message button). This brings up the flag message dialogue
3. Fill in the flag line, either by selecting an option from the drop down menu, or by typing in the action you would like the recipient to take (e.g., read and comment, call customer)
4. Fill in the by line to set the alert time, using today’s date and a time close to the current time. This is done by using the drop down menu, which exposes a calendar for selecting a date. Or, you can take advantage of Outlook’s ability to understand natural language by typing in a day and time, such as tomorrow at 2 PM.
5. Select OK.
6. Select send to deliver the message. Note when you receive the message there is a red flag in the header. Do not open the message until the alert goes off.
7. When the alert goes off select Open Item to open the message. Note the flag information above the from line on the message header.
8. With the message open click the red flag button on the tool bar. To clear the flag select clear flag. Or check the completed box to indicate that the issue has been addressed. Close the message. Note that if you select clear flag the flag is no longer in the header. If you choose completed the flag color changes from red to white.
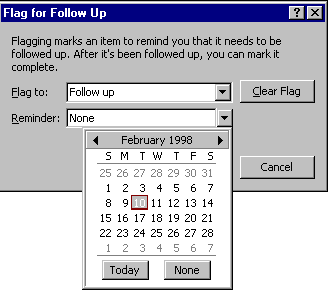 |
Figure 5: To assign a message flag, select the action and the date.
In addition you can use message flags as reminders on items in your own inbox to make sure important deadlines or action items are not missed.
To do this use the following steps:
1. Open a message in your inbox.
2. Click the message flag button on the toolbar
3. Fill out the Flag Message dialogue per the steps above.
Scheduling Meetings
Outlook includes a rich calendar component for both individual appointments and group scheduling. While most users first use the calendar for keeping track of individual appointments, they soon begin to see the benefits of group scheduling. Because Outlook is tightly integrated with Exchange users can receive and respond to meeting requests from the same inbox that they use for email; they use the same address book to send meeting requests that they use to send email; and they can use many of the same features—including attachments, setting priority level, message flags—when sending meeting requests that they use when sending email messages. To being taking advantage of group scheduling follow the steps below:
1. Launch Outlook. Click on the calendar icon in the Outlook bar.
2. Click the new appointment button on the far-left end of the toolbar.
3. In the subject line type in the name of the meeting.
4. In the location line type the location
5. Select the starting date and time. You can do this by using the drop down menus, or typing the date and time directly into the appropriate places.
6. Select the ending date and time.
7. Choose whether you want a reminder to go off prior to the meeting. The default will be set to yes, 15 minutes prior to start time.
8. Select how you want Outlook to show this time on the calendar. The options are busy, out of town, tentative, and free. The default is busy.
9. Type in any supporting information, such as an agenda, in the body section. Alternatively, you can attach supporting information, such as a document, the same way you do with an email message.
10. Click Save and close to save the message to your calendar.
You can also use Outlook scheduling to schedule meetings with other users, and book resources like conference rooms.
To use this group scheduling feature follow these steps:
1. Highlight the appointment you created in the steps above. Open it by selecting File, then Open.
2. To invite others to the meeting click the Attendee Availability tab. This takes you to the meeting planner, which provides a bar chart view of attendee schedules to allow you to pick a meeting time that is convenient to all.
3. Click invite others, bringing up the address book.
4. Select the names of the attendees who are going to be invited. Note that you choose to make an attendee a required or optional attendee (optional attendees may be a manager who needs to know that a meeting is occurring but does not need to attend).
5. Select OK. This prompts Outlook to look at the public schedule information for each attendee, which is stored on the Exchange server,.
6. Once the schedule lookup is complete you should see schedule information for each attendee represented in the bar chart, where a quick look will determine if there are any conflicts.
7. If conflicts exist change the meeting time or date by either completing the information in the appropriate lines, or by dragging the green and red bars across the bar chart. Alternatively, you can select Auto Pick and let Outlook find the first available time for all attendees.
8. Click the Appointment tab. Note that a To line has been added and includes the names of the attendees.
9. Select send to deliver the meeting request.
10. Close Outlook and launch using the profile of one of the users who were sent the meeting request.
11. In the Inbox double click on the meeting request.
12. On the toolbar there are 3 options for responding—accept, tentative, and decline. Select accept.
13. In the next dialogue select Edit the response before sending. Click OK.
14. Type comments into the body.
15. Select send to return the acceptance.
16. Click on the Calendar icon, and go to the meeting date. Notice that the meeting was automatically added to the calendar.
17. Close Outlook. Then re-launch using your original profile.
18. Go to the Inbox and notice that a new message has been delivered with the subject of Accepted. This allows you to quickly see whether an attendee will attend.
19. Go to the Calendar by clicking on the Calendar icon in the Outlook bar.
20. Select the meeting you scheduled and open it.
21. Click on the attendee availability tab to see whether an attendee has accepted
22. Close the meeting form.
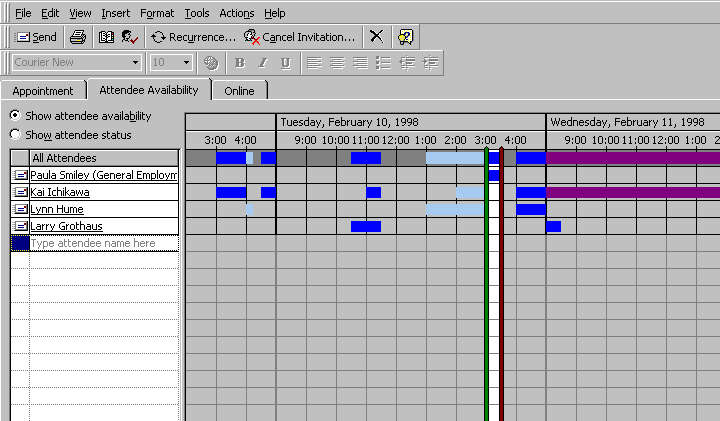
Figure 6: A key benefit of group scheduling is the ability to view free/busy times of meeting attendees.
When scheduling the meeting you probably noticed the tab Online. Outlook is integrated with Microsoft NetMeeting, an application that allows real-time online meetings. You can use Outlook to schedule these online meetings. When the reminder for an online meeting pops up, you will be prompted to start NetMeeting and start the meeting.
Managing Information
With email becoming more prevalent, users are finding themselves overwhelmed with information. One of Outlook’s primary strengths is its breadth of options for organizing and managing this information. Users have a number of easy to use options for working with information: sorting and grouping by different properties, using the Auto preview feature, using the Preview Pane, or setting up server and client based rules.
Sorting and Grouping
Users can dynamically sort messages by simply clicking columns:
1. Go to the Inbox
2. Click on the Received column to sort by date received in descending order, as noted by the triangle pointing down. Click again to sort by date received in ascending order, as noted by the triangle pointing up.
3. Click on the From column to sort messages alphabetically by sender.
In addition, users can add columns, which can then be used to sort messages:
1. Go to the View menu.
2. Select Current View, then Sent to. This will add a Sent to column.
3. Click on the Sent to column to sort on this property per above.
In addition to sorting, messages can be grouped by the properties of any column:
1. Go to the View menu.
2. Select Current View
3. Select Customize Current View
4. In the Customize Current View dialogue select Group by
5. In the Group by dialogue use the drop down menu to select the property by which you want items grouped. Select From, then Ascending.
6. Click OK, and in the next dialogue click OK again.
7. The items in your Inbox are now grouped by sender in alphabetical order. To view the messages click on the plus sign by the sender’s name. Also note that bold text indicates that there are unread messages from that sender.
8. To reset the Inbox to its original state go to the View menu and select Current View, then Messages.
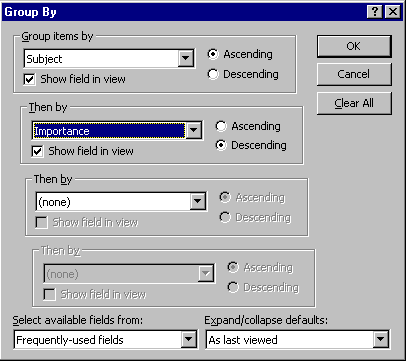 |
Figure 7: The group by dialog lets you group information by any number of criteria.
Auto preview makes it easy to view the contents of a message without opening it by showing the first 3 lines of unread messages in the Inbox.
To enable Auto preview:
1. Go to the View menu
2. Select Current View
3. Select Messages with Auto preview
4. The first 3 lines of all unread messages now appear under the bolded message header.
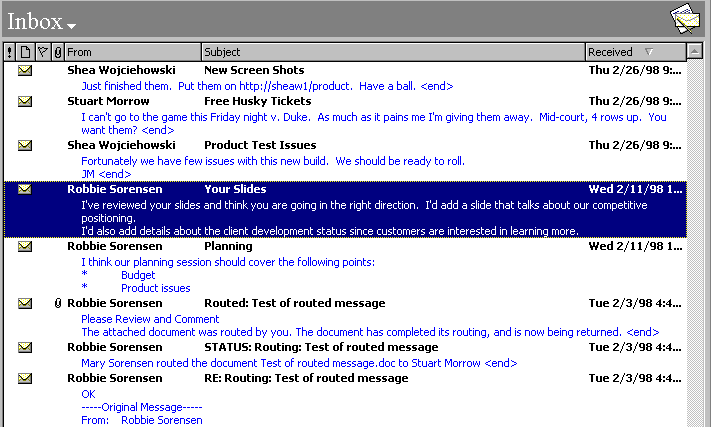
Figure 8: Select auto-preview to read the first three lines of your messages.
Sometimes viewing the first 3 lines of a message does not give you enough information, but you still want to avoid opening each message. For these times the Preview Pane becomes a useful tool. The Preview Pane is a third pane that allows you to read as much or as little of a message as you want without opening the message.
To enable the Preview Pane:
1. Go to the View menu
2. Select Preview Pane
3. You’ll now see a third pane below the list of items in the Inbox. The pane includes the header information as well as the text of the message.
4. Place your cursor near the top of the pane to change its size.
Figure 9: Select preview pane to read the contents of a message without having to open it.
Setting Up Private Folders
When Outlook is installed it sets up a group of default folders, including an Inbox, Calendar, etc. Most users want and need additional folders to help them organize their information. This is the purpose behind private folders.
Setting up private folders is easy:
1. Go to the View menu
2. Select Folder List. This exposes a view of all folders in your mailbox.
3. Right click on Outlook Today – [Mailbox - <name>]
4. Select New, then Folder
5. In the New Folder dialogue type the name of the folder, and use the drop down menu to select the types of items that the folder will contain. The default is Mail Items. Use the default.
6. Select OK.
7. When asked if you want to add the icon to the Outlook bar select yes.
Sometimes users want to access private folders when working offline.
To enable private folders for offline use do the following:
1. Single click on the folder in either the Folder List or the Outlook Bar
2. Right click, select Properties
3. In the Properties dialogue select the Synchronization tab
4. Under This folder is available select When offline or online
5. Click OK
6. The folder is now available when you are working offline and online. A quick way to determine if a folder is available for offline use is to see if it has a small blue arrow at the lower left corner.
7. In order to use folders when offline you must synchronize them. Do this by going to the Tools menu, then selecting Synchronize, then All folders.
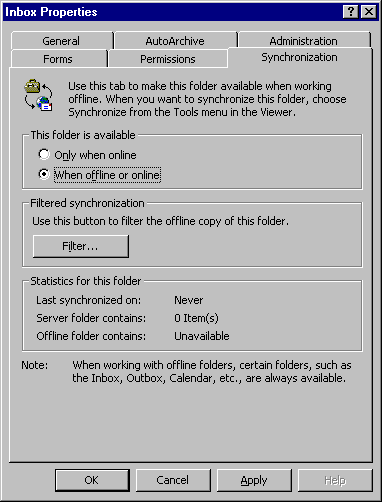 |
Figure 10: Enabling private folders for offline use.
Rules
Rules allow users to manage messages upon receipt. For example, you may want to be notified when your manager sends you an urgent message so you can deal with it immediately. Or you may want to move all messages dealing with a given subject to a private folder for later reading. Rules are established using the Outlook Rules Wizard.
To set up rules using the Rules Wizard follow these steps:
1. From the Tools menu select Rules Wizard
2. In the first Wizard screen select Move new message from someone. Click next
3. In the next screen make sure the box from people or distribution list is checked.
4. In the Rule description space click on the underlined phrase people or distribution list. This brings up the Exchange address book.
5. Select the name of a user from whom you receive mail. Click OK. Then next.
6. In the next screen check the box next to move it to a specified folder.
7. Go to the Rule description space and click on the underlined word specified. This brings up the folder list for your mailbox.
8. Select the folder you created above. Click OK.
9. Click next. Then next again.
10. Click Finish. This takes you back to the main Rules Wizard dialogue.
11. Click OK.
12. Close Outlook, then re-launch using the profile of the user your new rule refers to as the sender.
13. Compose and send a message to the user that you set up the rule as.
14. Close Outlook, and re-launch as the original user.
15. Open the private folder messages were being moved to to confirm that the rule works.
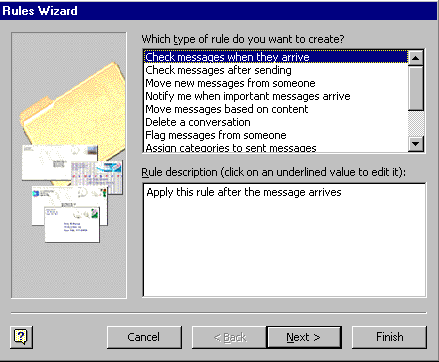 |
Figure 11: Rules Wizard allows users to set both server and client-based rules.
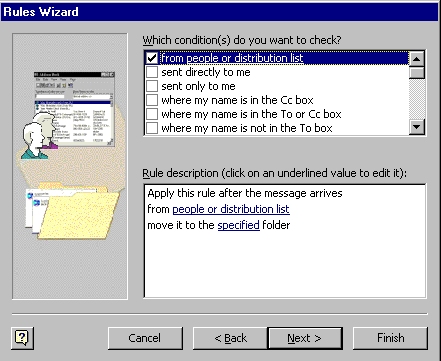 |
Figure 12: The Rules Wizard lets you set up rules based on a number of criteria.
Team Interaction
Collaborative applications facilitate team interaction, allowing teams to share information, coordinate projects, even conduct online meetings. In this section you will learn how to use Exchange and Outlook to perform some of the more useful tasks that help teams interact—using public folders to share information, setting up discussion groups, and setting up group task lists.
Publishing Information to Public Folders
Public folders are folders that are accessible to any number of people, from the entire organization down to a small working group. They reside on the Exchange server, and can be synchronized to the local hard drive for offline access. They can contain any type of information, from email messages to documents. And they are ideally suited to discussion groups that are accessible to members of the organization, or made public via the Internet.
To create a public folder do the following:
1. Launch Outlook
2. Go to the view menu and select folder list. The folder list should appear to the right of the Outlook bar.
3. Click the + sign by the Public Folders container. Then highlight the All Public Folders subfolder.
4. Right-click and select create subfolder.
5. In the create new folder dialogue type a folder name.
6. Use the drop-down box to select content type that the folder will host. The default is mail items, which is general purpose. The other options use specific forms (e.g., appointments, contacts, or tasks).
7. Select OK. When asked whether you want to add this folder to the Outlook bar select yes.
8. Once the folder has been created right-click on it and select properties.
9. Click the Summary tab
10. Add the folder to your Personal Address Book by clicking the Personal Address Book button by Add Folder Address To.
11. Click OK
There are a number of options available to you for publishing information to a Public Folder.
The easiest are dragging and dropping, and emailing:
1. Go to the Inbox.
2. Select a message. Drag it onto the icon on the Outlook Bar that points to the public folder you created above
3. Compose a new message. Instead of typing a name in the To line click on the To button.
4. In the show names from the space use the drop down menu to select personal address book
5. Select the name of the public folder
6. Click OK
7. Select send to deliver the message
8. Go to the Outlook Bar and click on the icon for the public folder. Both messages should be there.
As mentioned above you can drag and drop any type of item into a public folder. Try this by creating a Word document and dragging it into the public folder.
Setting up a Discussion Group
Discussion groups allow users to collaborate and share information. They are also useful for hosting list servers and knowledge bases that can be used by co-workers, business partners, and customers. You can use any Internet Newsreader, Web browser, or Outlook to access these discussion groups:
1. Launch Outlook
2. To view the folder tree, choose Folder List from the View menu, and then select All Public Folders.
3. From the File menu, choose New Folder.
4. In the Folder Name box, type a name for your discussion group
5. Under Folder contains select Mail Items (this is the default)
6. Select OK. When asked if you want to add a folder to the Outlook Bar select yes.
7. If not already logged on as Administrator, log on as the administrator. To do this go to the Start menu in Windows NT, click Shutdown, and then select Close all programs and logon as a different user.
8. From the Tools menu in the Administrator window, choose Newsgroup Hierarchies.
9. In the Newsgroup Hierarchies dialog box, choose Add, double-click All Public Folders, and then select your discussion group folder. With this folder selected, choose OK. You should now see your discussion group folder added to the Public Folder list in the Newsgroup Hierarchies dialog box.
10. When you are finished, choose OK.
1. Launch Outlook
2. Go the View menu and select Folder list.
3. From the Folder list select Public Folders, All public folders, and open the discussion group folder you created above.
4. From the Compose menu, choose New Post in This Folder.
5. Post two to three messages with different subjects to see how the postings are automatically filtered by message topic.
6. Group the postings by conversation topic by going to the View menu and selecting Current view, then By conversation topic.
Figure 13: Grouping postings by conversation topic.
Allowing Anonymous Access to Public Folders
In order to open a discussion group up to your customers or other users on the Internet it is necessary to allow anonymous access to the public folder. This means that a user does not have to have a Windows NT account on your system in order to participate in discussions. To allow anonymous users access to the Microsoft Exchange Server public folders, use the following procedure:
1. Right click on the public folder you created
2. Click the permissions tab
3. Click on Anonymous
4. Go to the Roles drop down menu and select Author
5. Click OK
6. Launch your Web browser
7. Type the URL http://<servername>/exchange to start Outlook Web Access
8. Next to the words public access click the underlined phrase click here. This will bring up a list of public folders
9. Click the folder you just assigned anonymous access to.
10. Post a message to the folder by going to the drop down menu next to Compose New and selecting Posting to this Folder.
11. Click Compose New.
12. Complete the posting form. Click the post button (yellow note with the thumbtack).
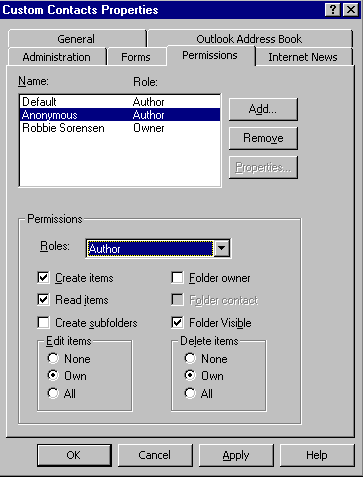 |
Figure 14: Use the permissions tab to allow anonymous access to Microsoft Exchange public folders discussion groups.
Setting up group task lists and contact databases
The steps above showed you how to set up and use public folders for sharing information and hosting discussion group. But public folders can also be used to host shared information like task and contact lists, creating easy ways for users to manage projects or contact databases. In this section you will learn how to set up a group task list and contact database.
To set up a group task list:
1. Launch Outlook
2. In the View menu select Folder List
3. Click the plus sign next to Public Folders
4. Single click on the All Public Folders container
5. In the File menu select New, then Folder
6. In the name space type Group Tasks
7. In the Folder Contains drop down menu select Task Items
8. Select OK
9. Select Yes when asked whether you want to add an icon for this folder to the Outlook Bar. Notice that the icon that appears is a task icon.
10. Open the folder you just created by clicking on the icon in the Outlook Bar. Notice that the folder is identical to your individual task folder.
11. Create a new task by selecting the New Task button on the left hand side of the toolbar. Complete the form by typing a task name, and other information as you desire.
12. Save and close the form.
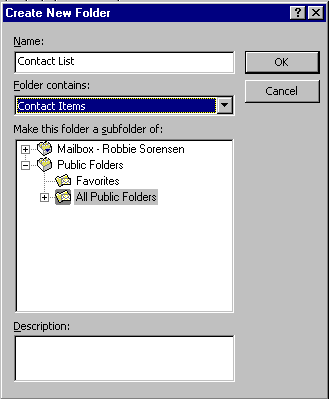 |
Figure 15: To set up a group contact list specify that you want your public folder to contain contact items.
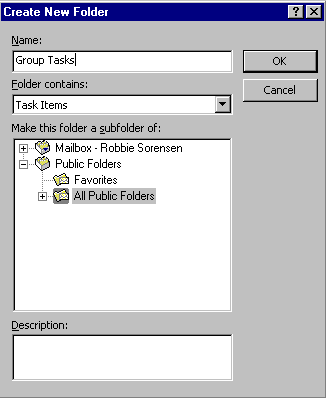 |
Figure 16: To set up a group task list specify that you want your public folder to contain task items.
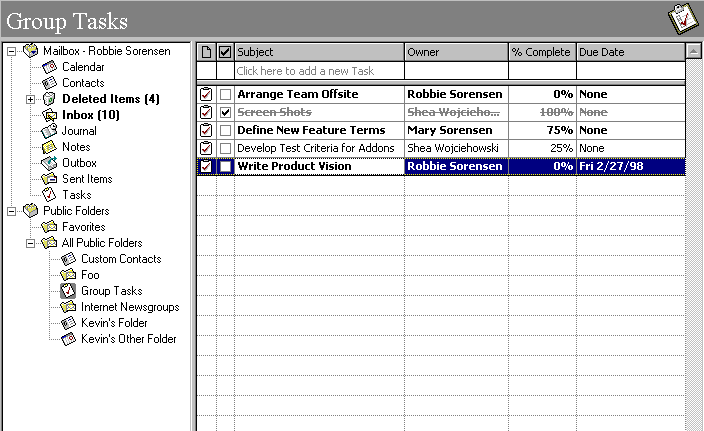
Figure 17: A group task list allows the entire group to manage their tasks in a central location, accessible to anyone.
Similarly, to set up a group contact database:
1. Launch Outlook
2. In the View menu select Folder List
3. Click the plus sign next to Public Folders
4. Single click on the All Public Folders container
5. In the File menu select New, then Folder
6. In the name space type Group Contacts
7. In the Folder Contains drop down menu select Contact Items
8. Select OK
9. Select Yes when asked whether you want to add an icon for this folder to the Outlook Bar. Notice that the icon that appears is a contact icon.
10. Open the folder you just created by clicking on the icon in the Outlook Bar. Notice that the folder is identical to your individual contact folder.
11. Create a new contact by selecting the New Task button on the left hand side of the toolbar. Complete the form by typing a contact name, and other information as you desire.
12. Save and close the form.
Because the task list and contact database you created are public folders they are accessible to anyone in your organization, or access can be limited to only those people on your immediate team. Set these access permissions as you did in the creating public folders section above.
Departmental Solutions
Collaborative applications should help departments work together more efficiently on projects. By building simple collaborative applications on top of the existing email system Exchange and Outlook not only improve efficiency, but make it easy to collaborate without building specialized applications.
In this section you will learn how to use Exchange and Outlook for departmental collaboration. Specifically to route documents and to customize existing forms. In the last part of the section you will learn how to convert Outlook forms to HTML for use with Outlook Web Access, and to use Exchange Routing Objects to set up document routing from within a public folder.
Document Routing
In the individual productivity section above you learned how to send a document as an attachment to an email message. Because Exchange and Outlook are tightly integrated with Microsoft Office it is also possible to go beyond sending documents as attachments and use all three tools to set up simple document routing. Document routing takes two forms—serial, where a document is routed from recipient to recipient; and parallel, where a document is routed to all recipients at the same time. The instructions for setting up simple routing follow the instructions below:
1. Launch Microsoft Word
2. In the word document type “This is a test of document routing.”
3. Save the document with the filename Routed Document
4. In Word, go to the File menu
5. Select Send To, Routing Recipient
6. In the Routing dialogue select Address
7. Select the recipients to whom you want to route the document, then click OK. Note that this is the same address book you use to select email recipients, meeting attendees, etc
8. Under Message text type “Please review and comment”
9. Under Route to recipients select “One after another”
10. Be sure that both Return when done and Track status are checked
11. Under Protect for use the default
12. Select Route
13. Launch Outlook. Use the profile of the first recipient you are routing the document to.
14. In the Inbox open the message with the routed document.
15. Double click on the document to launch it.
16. In the document add a sentence.
17. Go to File, Send to, Next routing recipient
18. In the next dialogue select Route document to <user name>
19. Select OK
20. Close Outlook. Re-launch using the profile of the user who created the original routing document. Notice that the Inbox now includes a message giving the status of the document.
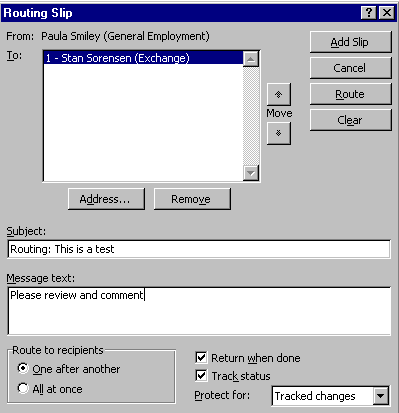 |
Figure 18: You can route documents to others, using Exchange, directly from Word.
Creating Custom Forms
Outlook ships with a number of custom forms, including forms for tasks, contacts, and appointments. Often these forms meet customer needs. But sometimes you may want to include information on a form that goes beyond what the is able to contain. In these instances you should be able to customize the form for your specific needs without having to rewrite it. In this section you will learn how to customize a form without coding, and save it to a public folder for use by the entire department:
1. Launch Outlook
2. Go to View, select Folder List
3. Click the plus sign next to Public Folders, then select All Public Folders
4. Go to File, New, and select Folder
5. Type the folder name Custom Contacts
6. Under Folder Contains select Contact Items
7. Click OK
8. When asked if you want to add an icon for this folder to the Outlook Bar choose yes.
9. Click on the icon on the Outlook Bar and go into the folder Custom Contacts
10. Open a new contact form by clicking the new contact button on the left hand side of the toolbar
11. On the contact form go to Tools, then select Design Outlook Form. This takes in to “design mode.” Notice how the form changes, giving you additional tabs with page numbers, and a designer toolbar (which should be grayed out)
12. Click on the tab that says (p.2)
13. You will now see a blank page. And you will see the Field Choosier. You will use the Field Choosier to select the custom fields you want to add to your form.
14. Go the Field Choosier and select two to three new fields. Drag each one onto the blank page that is (p.2). In addition to adding the new fields you can arrange them any way you want them to look.
15. Go to the Form menu and select Rename Page
16. Type the name “Custom Fields” into the Page name space. Click OK.
17. Go to File and select Publish Form As
18. Under Form name type Custom Contact Form. Be sure that the name next to the Publish In button is the same as the new Contacts folder you created in steps 1-7 above. Select Publish.
19. Go to the Tools menu and select Design Outlook Form. This takes you out of design mode.
20. Go to File, then Close, to close the form. Select Yes when asked if you want to save changes. If you are asked whether you want to save the form with a blank File As field say yes.
21. To test your form go to the Contact Menu. Select Custom Contact Form at the bottom of the menu. This will bring up the custom form you just created, which includes the custom page and fields you added.
22. If you desire you can close Outlook, re-launch as another user, go into the Custom Contacts folder and repeat step 21 to show that other users can see the form as well.
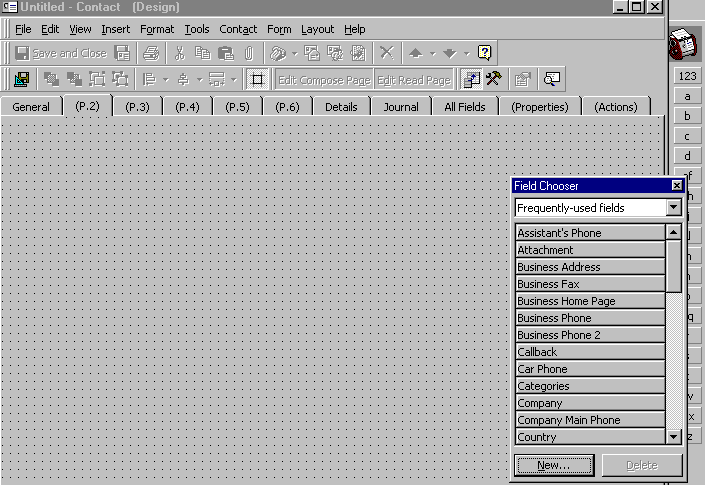
Figure 19: Create a custom form without coding and save to
a public folder for everyone’s use.